


Step-by-Step Guide to Installing Pavers Over Concrete or Asphalt
Installing concrete pavers can significantly enhance the aesthetic of an existing municipal plaza, or add definition to features of public spaces such as crosswalks and paths. Under the right circumstances, it is possible to overlay pavers on existing asphalt or concrete to simplify the project and reduce cost.
The Basics: Unit Pavers vs. Poured In-place Concrete
When considering outdoor surfaces, understanding the differences between unit pavers and poured in-place concrete slabs is crucial for making an informed decision. Pavers are individual units made from materials such as concrete, clay, or natural stone, and are available in a wide array of shapes, colors, and textures. This versatility allows for intricate designs and aesthetically pleasing patterns that can enhance any outdoor space.
Functionally, pavers offer superior durability and flexibility compared to poured concrete slabs. They are less prone to cracking because the individual units can move slightly under stress, accommodating ground movement and changes in temperature.
Additionally, pavers can be easily replaced if damaged, while repairing a concrete slab typically involves more labor and higher costs. Overall, pavers provide a more adaptable and visually appealing solution, making them a popular choice for homeowners and contractors looking to create stunning and resilient outdoor environments.
Pros & Cons of Installing Pavers on Top of Concrete
Installing pavers on top of an existing concrete surface offers a convenient way to enhance outdoor areas, providing both functional and aesthetic benefits. However, this approach also comes with certain drawbacks. Understanding the pros and cons of this method will help you make an informed decision on whether it’s the right solution for your patio, driveway, or walkway upgrade.
Pros
– Reduced Installation Time
By utilizing existing concrete as a base material, installation of the setting bed and pavers can begin immediately after the concrete has been prepped. Eliminating the need for excavation and base material streamlines the installation process allowing the workers to concentrate on placing and securing the pavers. Overall, this method reduces the project duration and labor costs making it an efficient option for upgrading outdoor spaces.
– Cost Effective
As stated above, installing pavers over existing concrete saves time and labor. By utilizing existing concrete as a base material, the cost of removal and disposal of the concrete, excavation, and new base materials are eliminated from the project greatly reducing project costs. Future repairs are more economical, as individual pavers can be replaced easily. This makes the overall project more affordable, both initially and in the long run.
Cons
– Thicker Pavement
One notable drawback of installing pavers on top of an existing concrete surface is the increased thickness of pavement. The addition of pavers can elevate the surface by several inches, potentially causing clearance issues with door thresholds and hindering the operation of exterior doors. This added height can also create uneven transitions between different areas, posing potential tripping hazards. Moreover, it may necessitate adjustments to surrounding features such as steps, railings, and landscape elements, which can add complexity and cost to the project. However, this issue can be addressed by proper planning and design adjustments. For example, using thinner pavers can minimize height increase, and implementing ramps or gradual transitions can ensure a smooth, safe, and visually cohesive integration with the existing landscape. By considering these factors in advance, homeowners and contractors can effectively manage and mitigate the challenges associated with increased pavement thickness.
– Drainage Concerns
One potential drawback of installing pavers on top of an existing pavement surface is the concern related to drainage. Traditional concrete and asphalt are impervious, meaning that water cannot seep through, potentially leading to water pooling on the surface or around the edges of the pavers. Poor drainage can cause water damage to adjacent structures, promote weed growth, and create slipping hazards. However, these drainage issues can be effectively addressed through thoughtful design and installation techniques. Drains can be installed at strategic locations, and week holes can be drilled in the existing asphalt or concrete, to redirect water collected in a bedding sand or bitumen-sand layer. Additionally, slight grading can be employed to guide water away from critical areas. By addressing these drainage considerations, you can ensure a functional and safe outdoor space while enjoying the aesthetic and practical benefits of pavers.
Paver Overlay Installation Methods
When installing pavers over existing concrete or asphalt, there are three primary installation options: sand set, bituminous set and mortar set. Outlined below are the details for how to install pavers over concrete or asphalt and the use cases for each of the three installation options.
To reduce the potential for problems with installing pavers over concrete, it’s important to first determine whether the existing concrete or asphalt on the job site is in good enough condition to be overlaid. Major defects in the concrete base, like large cracks, will compromise the integrity of the paver installation.
Another important factor is allowing for proper drainage of the site. Ensure that the concrete base slopes away from any structures and storm water runoff has been accounted for to prevent accelerated erosion of the surrounding area and so that the installation will remain in good condition.
Option 1. SAND SET

This method of laying pavers over a concrete base is most common in pedestrian applications, although it can be applied in vehicular applications as long as a suitable curb and durable bedding sand is used. To install pavers over concrete or asphalt using a sand set application:
Step 1: Place a level 1″ sand bedding layer between the pavers and underlying asphalt or concrete (similar to a standard installation).
Step 2: Place draining holes at low spots to allow water that seeps into the joints to escape. Drain holes are required at low spots to allow water that seeps into the joints to escape. This method is most common in pedestrian applications, although it can be applied in vehicular applications such as a driveway as long as suitable curb and durable bedding sand is used.
Step 3: Complete your paver installation, following the directions provided with your pavers.
Option 2. BITUMINOUS SET
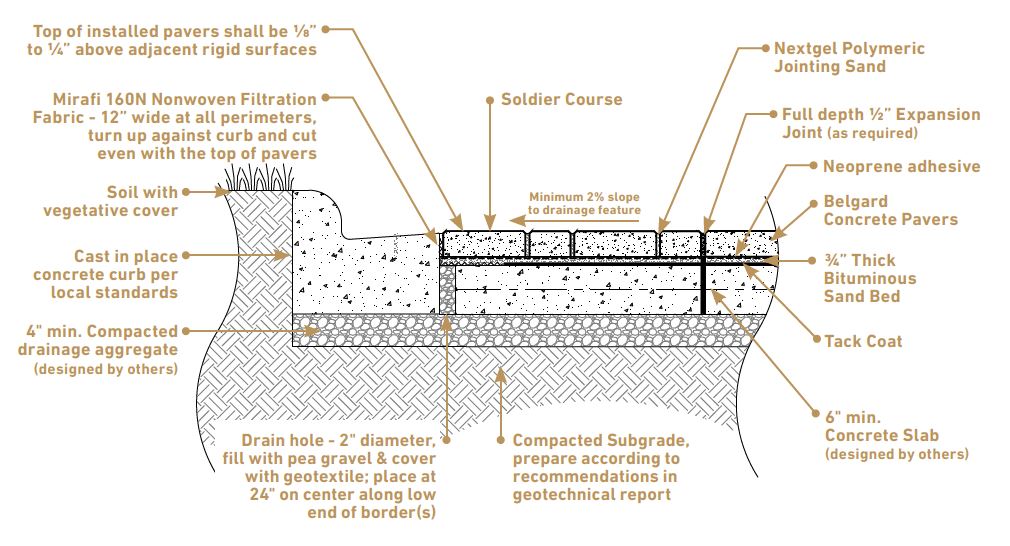
This is similar to sand set except a bituminous binder is added to the bedding sand which, in essence, adheres the pavers to the underlying concrete (pedestrian or vehicular applications) or asphalt (pedestrian applications only).
Step 1: Place a level 1″ bedding layer of sand mixed with bituminous binder between the pavers and underlying asphalt or concrete.
Step 2: Ensure draining holes are placed in low spots, allowing water that seeps into joints a place to escape.
Step 3: Complete your paver installation, following the instructions provided with your pavers.
Option 3. MORTAR SET
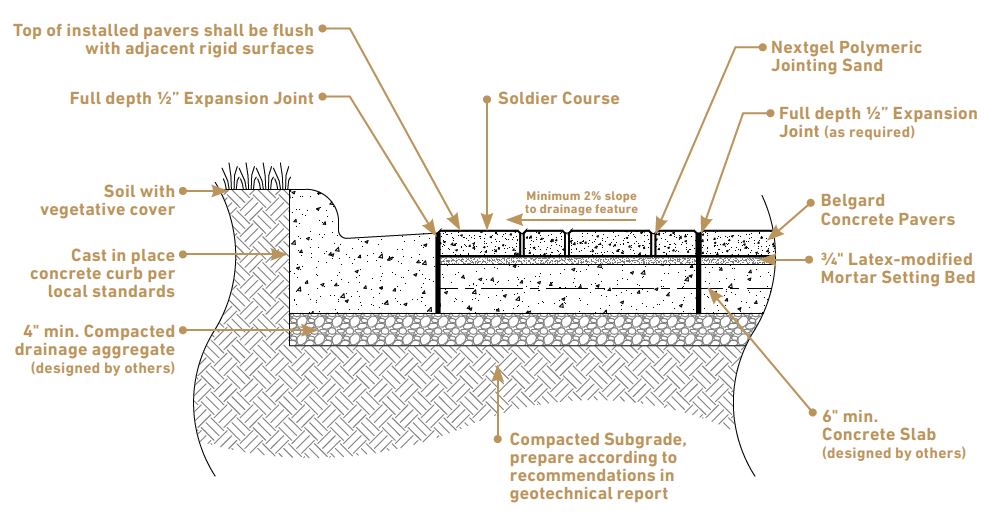
A mortar set approach is an adhered design solution that bonds the pavers to a concrete base. It is typically used for non-vehicular applications. Latex modified mortar is recommended over traditional cement sand mortars. This assembly should be used with design input from the mortar supplier.
Step 1: Clean the concrete surface of all dirt, oil, and debris. Allow to dry.
Step 2: Place 3/4″ of latex modified mortar as a setting bed, adhering it to the concrete. Work in small areas to ensure the mortar stays wet for paver application.
Step 3: Place a pointing mortar into the joints around each paver. some residential non-vehicular applications a polymer jointing sand may be suitable.
Step 4: After the mortar has dried, use a brush or mortar striking tool to remove excess mortar.
Step 5: Finish your project by applying a paver sealer. In northern climates, the mortared joints need to be regularly maintained to prevent moisture penetration, and the use of de-icing salts is discouraged.
Installing pavers on top of concrete or asphalt is a practical and efficient way to revitalize your outdoor spaces, offering both aesthetic and functional benefits. By considering the pros and cons, such as time and cost savings, increased thickness, and drainage concerns, you can make informed decisions to ensure a successful project.Ready to get started? View a few of our favorite overlay pavers suited for commercial applications below: Holland Stone, Catalina, Dimensions, Origins, and Moduline. With the right planning and materials, your new paver installation can enhance the beauty and durability of any outdoor surface.
